The challenge of constructing a rock wall is that you need to build it out of rock. Most standard construction methods aren’t feasible because of the nature of the materials, so your best option is to use mortar instead. Mortar is essentially a strong glue that holds things together better than other alternatives. It’s also relatively easy to mix and apply with the right tools and techniques. Read on to learn how to build a rock wall with mortar!
How To Build A Rock Wall With Mortar?
Talk to a Contractor
If you’re looking to build an extensive rock wall or you’re just not sure if you have the skills or time to do it yourself, you may want to consider hiring a contractor. They can help you with the planning process and guide you through the different options you have. They can also help you determine what materials you should go with based on your project’s requirements. It’s also worth noting that hiring a contractor may be a bit more expensive, but it could be worth it depending on the scale of your project. Plus, you may be able to take advantage of contractor discounts or specials during certain times of the year. Keep in mind that hiring a contractor can also make your rock wall a lot more sturdy and long-lasting. Contractors are experts in this field and can make sure your wall is properly constructed to last for years to come.
Lay the Foundation
Before you start building the wall itself, you need to make sure your base is strong enough to support it. For a small wall, you’ll want to lay about a foot of gravel at the bottom. For a larger wall, you may need more. The gravel helps give the wall more structure and keeps it from sinking into the ground. It’s also worth noting that you’ll want to lay the gravel in a sloped fashion to ensure water flows through it. Water is essential to the growth of various species of plants, so you don’t want to block it out. For a larger rock wall, you may want to add a layer of dirt to the bottom of your base before laying down the gravel. This will help keep everything stable and strong. It’s also a good idea to start off with a firm base so your wall isn’t sinking into the ground as you build it. It’s better to be safe than sorry and have to tear down your wall after a year of construction.
Use Rocks as Mortar
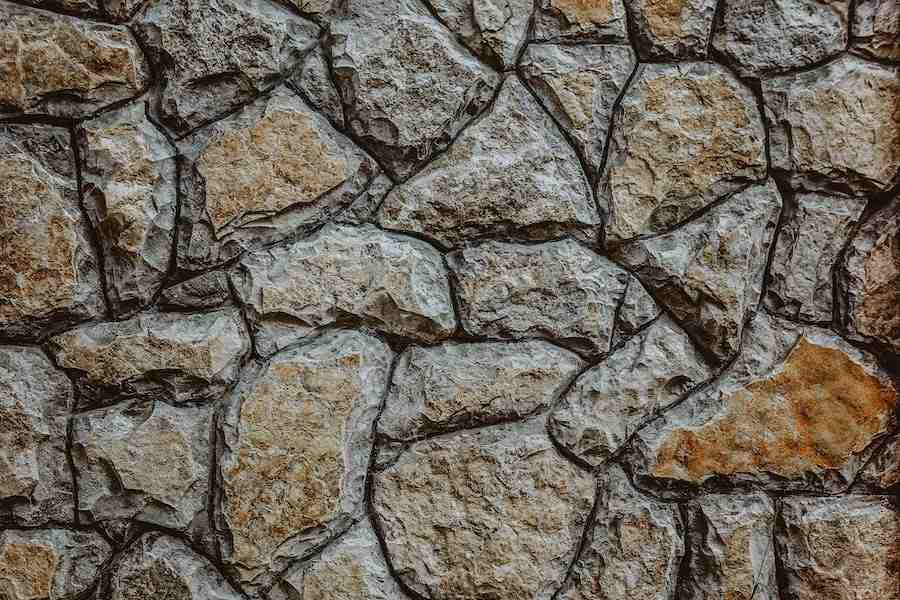
While most people would assume you need cement to build a rock wall, you actually don’t. You can use rocks as your mortar for a stronger, more sustainable wall. This is a great way to get creative with the design and add your own flare to the wall. There are many different combinations you can use to achieve the look you want. You can use different sizes and textures of rocks as well. Depending on the size of your wall, you may want to use smaller rocks as mortar for the top layer of the wall. This can be easier to work with, though it might not be as strong as a larger piece of rock. You’ll also want to make sure you’re using a consistent pattern throughout the wall. Avoid using too many different types of rocks or textures, otherwise, your wall may look a bit unbalanced.
Add a Bottom Layer of Rocks
If you’re just building a small rock wall, you may not need to build a base before constructing it. Instead, you can lay a layer of rocks at the bottom of your wall to provide more strength. This works best with rocks that have a flat and even surface. This way, the rocks sit flush against each other for a more seamless appearance. Depending on the size of the wall, you may want to use larger rocks as a base layer. This can help give the wall more durability and strength. You can also use smaller rocks, but they may not be as effective. It really depends on the type of wall you’re building and the look you’re going for.
Add More Rock and Mortar
For a more traditional wall, you can build a base and then construct the wall on top of that. This is a great option if you want to add a decorative element to the wall. It’s also a good option if you want your wall to be a bit taller. Typically, you want your rock walls to be about knee-high so they don’t trap water against the ground. Before adding more rock and mortar to the wall, be sure the base is properly set and doesn’t move or shift. Once you’ve laid the rock at the top of the wall, it’s more difficult to fix any issues with the base.
What Type Of Mortar Should You Use?
- For construction projects, you’ll want to use a type of mortar called “lime-based” mortar. You might also hear this type of mortar referred to as “lime-sand mortar.” Lime-based mortar is the most common type of mortar.
- It’s been used for thousands of years, and it’s still widely used today. Lime-based mortar is made of clay, sand, and water.
- It’s mixed like any other type of mortar — except it requires more water than other types of mortar. That’s because lime-based mortar is relatively soft, which makes it easier to apply to the rocks.
Tips For Using Mortar To Build A Rock Wall
Mix your mortar well
The first thing you need to do when getting started with your mortar is to mix it well. Use a shovel to mix the components of your mortar together until they look even. If you don’t mix the mortar well, you may end up with uneven patches or droops in your wall. Stir your mortar for about two minutes to ensure it’s properly mixed. While you don’t want to add too much water to your mortar, you want to make sure the consistency is right. It should be thick enough to stick to the rocks, but not so thick it won’t hold the rocks in place.
Use the right tools
When you’re building your rock wall, you’ll want to make sure you have all the right tools on hand. A tool belt is an excellent idea as it will help keep you organized and make it easier to get to the tools you need. Start by making sure you have a trowel. A small trowel is best for applying mortar to your rocks. You’ll want to use a larger trowel for applying mortar to your wall. Make sure you have a bucket with a spout to hold your water when mixing your mortar. Try to use tools that are made of wood or plastic. Metal tools can react with the mortar and change the consistency. You’ll also need to have a mallet on hand. A wooden mallet is best since metal mallets can cause the same reaction as metal tools.
Hammer in your rocks
Now that your mortar is mixed, it’s time to place your rocks. It’s best to start at the bottom of your wall and work your way up so you can use the mortar that drips down to hold the rocks in place. Place your rocks in a way that makes it easy to hammer them into place. You may want to put down a tarp or a piece of cardboard to catch any mortar that drips off the rocks. Once the rocks are where you want them, use your trowel to apply mortar to the rocks and the wall. It’s best to apply a thick layer of mortar to your rocks. This can help keep them in place, but you’ll also need to hammer them into the wall. Push the rocks into the mortar to help them stick to the wall. You may even want to leave the rocks in place for a few hours after you’ve applied the mortar.
Don’t forget to stain
Once your wall is dry, it’s time to finish your project with a coat of stain. You can use almost any stain you’d like, but many experienced rock wall builders recommend using a stain that has a lower viscosity. This will make the stain spread more evenly over the wall and will help you get a smoother finish. Start by applying a thin layer of stain to your wall. You don’t want to go too heavy because you can always go back over the stain if you need to. Once your stain is dry, you can finish your wall with a sealant or other finishing product.
Conclusion
Mortar has been used for thousands of years as a strong adhesive and construction material. For a rock wall, using mortar is a great way to ensure that the rocks stay together. You’ll need to make sure you find the right rocks for the project and use a lime-based mortar to get the best results.